A dash cam is one of the best tools you can add to your car for safety and peace of mind. Whether it’s for recording daily drives, providing evidence in case of accidents, or keeping an eye on your vehicle while parked, a proper dash camera installation is essential.
In this guide, we’ll cover dash cam setup, dashcam wiring, how to wire a dashcam, and how to install dash cam front and rear. We’ll also explain the difference between simple plug-and-play installs and a hardwire dash cam installation.
How to Install a Dash Cam: Complete Step-by-Step Guide
If you’re wondering how to set up a dashcam or how to install a dash camera in your car without professional help, follow these beginner-friendly steps.
Step 1: Choose the Right Placement
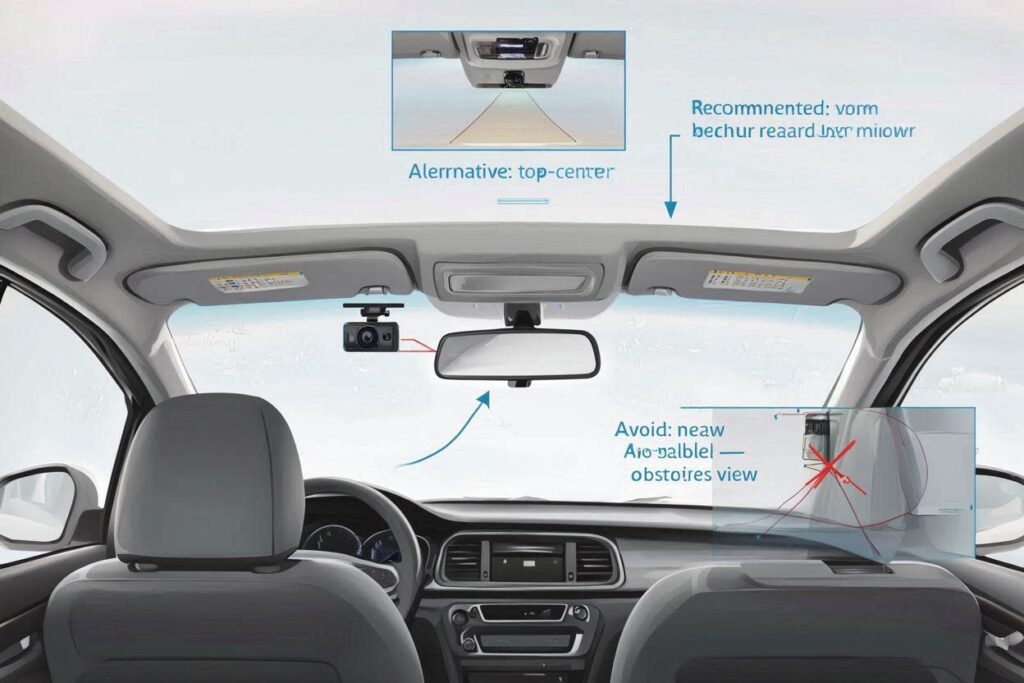
- The best dash cam fitting is usually behind the rearview mirror.
- Make sure it doesn’t block your field of vision.
- For rear dash cam installation, mount it on the rear windshield.
Step 2: Connect the Power Cable
- Use the supplied USB cable or cable dash cam adapter.
- Plug it into the cigarette lighter socket (12V port).
- Tuck the wire neatly using the headliner and side trim panels.
This is the easiest method for car dash cam installation, and most people can do it in under 30 minutes.
Step 3: Test the Dash Cam
- Turn on your car to power the dash cam.
- Make sure it starts recording automatically.
- Check the memory card and resolution settings.
Step 4: Adjust the Angle
- Position the camera so it captures the entire road.
- Avoid too much dashboard or sky in the frame.
At this point, your dash cam setup is complete. But if you want a cleaner look, constant power, or parking mode, you’ll need to learn how to hardwire dash cam.
Read: Hardwire kit installation
How to Hardwire a Dash Cam (Advanced Installation)
A hardwire dash cam installation connects the dash cam directly to your car’s fuse box. This gives you uninterrupted power supply, allows parking mode, and hides all wires for a professional look.
Here’s a breakdown of how to wire in dash cam systems:
Step 1: Run the Wiring and Hide the Cable
- Route the dashcam wiring neatly through the headliner and down the A-pillar.
- Use a trim tool to avoid damaging panels.
Step 2: Locate the Fuse Box
- The fuse box is usually under the dashboard or near the glove compartment.
- Check your vehicle manual if unsure.
Step 3: Identify ACC and Constant Power Fuses
- ACC Fuse (Accessory) → Powers on only when ignition is on.
- Constant Fuse → Always provides power, even when car is off.
- This setup allows the dash cam to work in both driving and parking modes.
Step 4: Connect the Hardwire Kit
- Use an add-a-fuse kit for safe dash cam wiring.
- Connect the red wire to the ACC fuse, the yellow wire to the constant fuse.
Step 5: Ground Wire Connection
- Attach the black ground wire to a metal bolt or grounding point near the fuse box.
Step 6: Test the Hardwired Installation
- Start the car: the dash cam should turn on.
- Turn off the car: the dash cam should switch to parking mode.
Now your hardwired dashcam is fully functional.
Read: 2-wire vs 3-wire hardwire kits
Installing Front and Rear Dash Cams
If you have a dual dash cam setup:
- Install the front camera as described above.
- Run the rear camera wire through the roof lining to the back windshield.
- Use clips or cable ties to keep the dash cam wire installation neat.
This type of car camera installation ensures both front and rear views are recorded.
How to Install a Wireless Dash Cam
Some newer models allow wireless dash cam installation. Instead of routing wires:
- Mount the camera with adhesive or suction.
- Power it via built-in battery or OBD-II adapter.
- Sync with your phone using Wi-Fi or Bluetooth.
This makes car camcorder installation much simpler, though battery life may be limited.
Tips for Professional Dash Cam Install
- Always use a high-endurance microSD card.
- Choose the right angle during dash cam fitting.
- If unsure about how to wire dash cam, get professional help.
- For fleet or taxi use, consider cardvr video installation with multiple cameras.
Read: best placement for dash cams
Conclusion
Learning how to install dash cams is easier than most people think. For beginners, a simple plug-and-play dash cam setup works perfectly. For advanced users, hardwiring dash cam installation offers better features like parking mode and hidden wiring.
Whether you’re doing a rear dash cam installation, a car camcorder installation, or just want a clean setup, following this guide ensures your camera works flawlessly.
Frequently Asked Questions (FAQs)
Q1: Where should I install a dash cam?
The best place is behind the rearview mirror for a clear road view. For rear dash cam installation, mount it on the back windshield.
Q2: Do I need professional dashcam installation?
No. Most people can do a basic dash cam install at home. Hardwiring may require more skill but is still DIY-friendly.
Q3: Can I install a dash cam without wires?
Yes, if you choose a wireless dash cam installation. But wired options are more reliable.
Q4: Does hardwiring dash cam drain the battery?
Not if you use a proper hardwire kit with a low-voltage cut-off feature.
Q5: How long does it take to install dashcam?
- Basic plug-and-play: 20–30 minutes
- Hardwire dash cam installation: 1–2 hours
Q6: What tools do I need for dash cam wiring?
- Trim removal tool
- Fuse tap (add-a-circuit)
- Multimeter (for identifying fuses)
- Electrical tape or cable ties